Upscale Cineroc/OmegaAugust 11, 2006: My current project is an upscale (approximately 2X) version of the Estes Omega rocket and its Cineroc payload. The Omega/Cineroc was a two-stage D-engine rocket with a movie camera payload. My version is single-staged, but includes two sets of fins to match the look of the original rocket.
 The Original Omega/Cineroc I began by designing the rocket in RockSim using mostly off-the-shelf components. The result is a three-inch diameter rocket which is about 72" long. So it's a little less than twice the diameter of the original, but a little more than twice the length. The Cineroc payload is four inches in diameter and will carry a small Polaroid Studio 4 digital movie camera. The rocket will have a 38mm motor mount with positive motor retention. I'll build a 38mm to 29mm adapter for it. It should fly well on an I motor. I've bought a PerfectFlite altimeter for the rocket and will use it for dual deployment. I began by fiberglassing the three-inch LOC Precision body tubes. I cut circles out of foam which which I slid onto long rods. The body tubes fit over the foam circles creating a handy stand for fiberglassing the body tubes.

I used a layer of 4oz. fiberglass followed by a layer of 2oz. fiberglass. I used West Systems epoxy resin and hardner.

I created a conical nose cone by attaching a styrofoam cone to a four-inch bulkhead and coupler then covering the cone with fiberglass. I included an eyenut on the tip of the nose cone which is anchored to the bottom of the payload section. This will allow me to rig the recovery system so the parachute points earthward during descent.

The set of eight fins and two launch-lug stand-offs were cut from 1/4 plywood. I'll cut slots in the bodytube for the fins and standoffs so they will be mounted "through-the-wall."

The payload section consists of the nose cone, a four-inch body tube, the camera box, the camera shroud, and a four-inch to three-inch transition.

The camera box is constructed of 1/8" plywood and a centering ring.

The camera shroud is also made of 1/8" plywood. It has a hinged lid to allow the camera to be inserted into the payload section. The lid will have a layer of soft foam glued inside it to help hold the camera in place when it is installed in the rocket.

I'm going to temporarily replace the transition on the bottom of the Cineroc payload with a four-inch coupler. This will allow me to launch the camera payload on my "Mustang Sally" (EZI-65) while I continue working on the Omega clone. I finally got around to sanding the camera shroud to the correct shape and gluing it to the body tube of the Cineroc payload. The payload doesn't look exactly like a real Cineroc - it's a lot bigger, the dimensions are different, and the shroud is a different shape - but when painted black, it'll be obvious what it is supposed to be. I need to see if I can find 2x Cineroc decals for it. Last weekend, I painted the Cineroc payload section gloss black. It made the nose cone look pretty bad. So I'm going to sand it down and see if I can smooth it out some. Then I'll paint it flat black which shouldn't show the rough spots as well.
Yesterday, while enjoying the nice weather as Tropical Storm Ernesto paid a visit, I cut out the slots in the body tube for the eight fins and two launch lugs. I used masking tape to outline the locations for the slots. Then I used a Dremel rotary tool with a cutting disc to cut out the slots. September 10, 2006: At the September 9, 2006, NEFAR launch, I made two test flights with my "Mustang Sally" (EZI-65) carrying the Cineroc and its digital camcorder. The flights and results are described in the PayloadBay.com article titled "Upscale Cineroc Takes Flight."
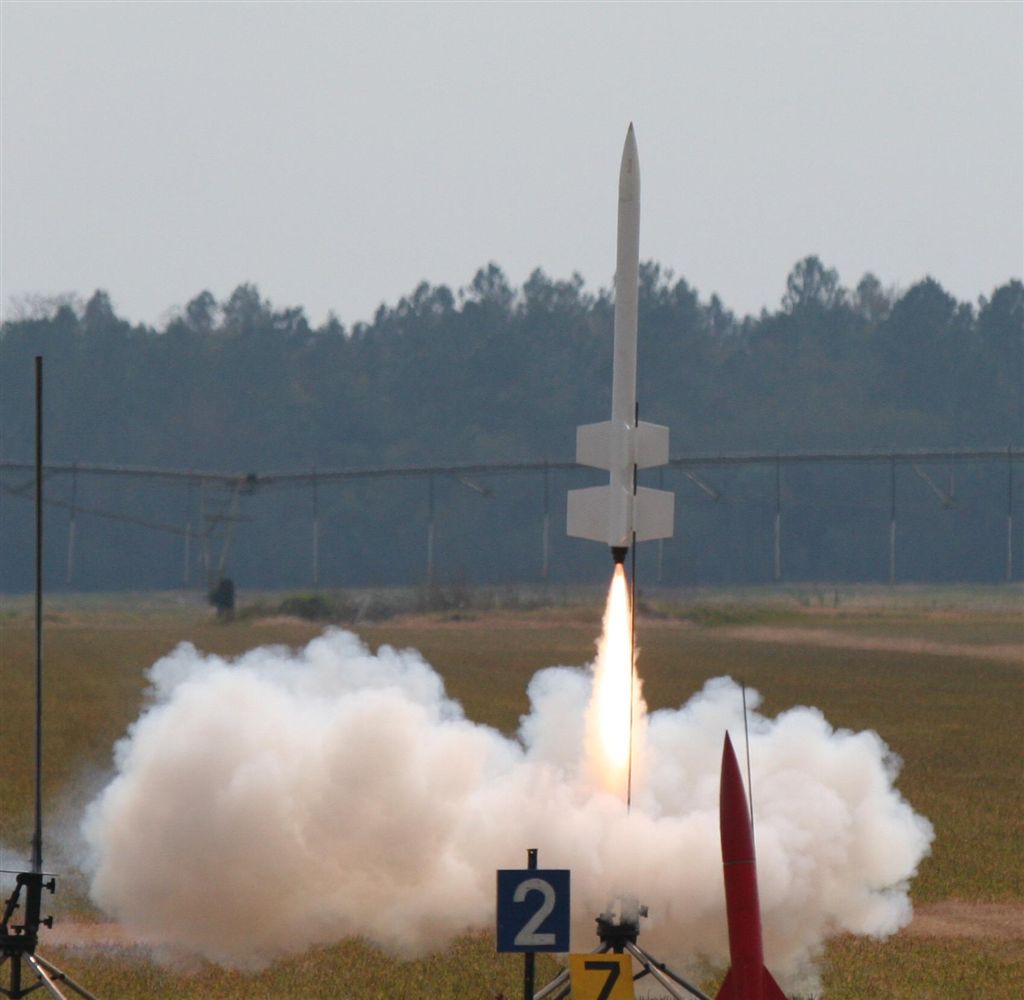
 Lift-Off! Photographs of the launch are in the PayloadBay gallery's NEFAR Rocket Launch (2006-09-09) album. The camcorder's video and still frames from the video are in the First Test Flight album. February 20, 2007: It's been a while since I've updated this article. In the past few months, I glued the fins and launch lugs to the Omega rocket, filled and sanded the body, and painted it with primer. I added a 3" nosecone that my wife won at a raffle in November and launched the upscale Omega on an I200 motor at the February NEFAR launch.
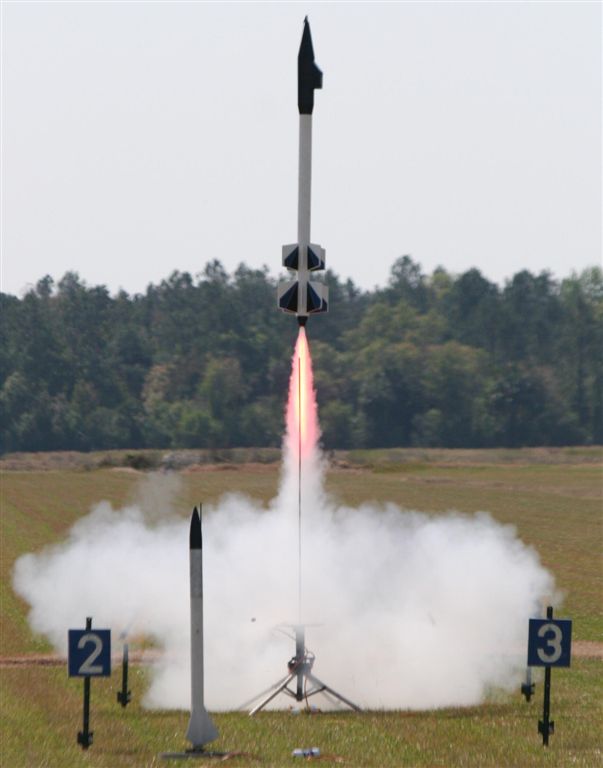
The flight was picture perfect. After the motor quit thrusting and the rocket coasted to apogee, you could hear it whistle. In the photograph, it looks as though the rocket has a nice boattail. Actually that's a 54mm to 38mm motor adapter with a Slimline retainer inside the rocket's 54mm motor mount with a Slimline retainer. Inside that adapter is a 38mm to 29mm adapter also using a Slimline retainer. March 11, 2007: I hadn't finished painting the rocket, but I wanted to fly it with its Cineroc at the NEFAR launch. So I drew some "decals" using Photoshop and printed them on sticky label paper. I cut them out and stuck them to the rocket. The result looked better than I had expected.
I flew the rocket on an H268 motor.
The flight was very nice although it took a little too long for the parachute to deploy. I think we packed it too tight. But when the new Rocket Rage 'chute did open up, it attracted a lot of attention.
Click the icon below to view the video from onboard the rocket.

[Posted: 2006-08-11 | Updated: 2008-10-29] |